Apple’s suite of products like the iPhone, iPad, Mac, and Watch have always been considered next-gen and ahead in their respective sectors but if there’s one thing that makes them better is the “ecosystem” that ties them well together. This ecosystem merges most of the apps and features that people use on their devices into a single cohesive experience that works together and behaves similarly no matter which device you pick.
Because of this, an app, website, or service will look and feel the same way across an iPhone, iPad, or Mac. If you own more than one Apple device, you can expect it to work with one another like getting your calls on other devices if you don’t have your iPhone around or starting a mail draft on your Mac and finishing it up on your iPhone or iPad. There are loads of possibilities and it’s hard to argue that the iPhone and Mac are the two Apple devices that benefit the most from this ecosystem.
If you own both an iPhone and a Mac and are looking to pair them with each other, then this article should explain everything you need to know about what can be done and how to get these two devices connected into a single entity.
Related: How To Delete iTunes Backup On Windows 11
Pair an iPhone with a Mac: What to know
Pairing an iPhone with a Mac (or Macbook) can be done in various ways. The most basic way of linking the two devices happen when you initially set up the two devices. Yes, the minute you sign in to your Apple ID from your iPhone and Mac, both the devices are somehow connected through Apple iCloud. With iCloud, you can backup pictures from an iPhone, sync passwords, addresses, sensitive information, and all other data from other apps on your iPhone and Mac. When enabled and set up properly, you’ll be able to access the same content on any app you use on either of your devices.
Besides syncing via iCloud, users can also transfer files and other content through a USB-to-Lightning cable or over Wi-Fi or they can use AirDrop to drag and drop the same items instantly. Apple’s ecosystem also allows people to get and make iPhone calls directly on a Mac and you can also configure it to receive and send SMS messages on a Mac without using an iPhone.
Another way to pair a Mac and iPhone is using Handoff, a feature that lets you start something on one Apple device and pick it up on another device seamlessly. The same feature is what’s behind the Universal Clipboard tool that lets users copy texts, pictures, and videos from an iPhone onto a Mac and vice versa. Apple also lets its Music subscribers sync their audio library across all their devices using Sync Library.
Related: How to Backup iPhone on Mac
Requirements:
To pair your iPhone with a Mac, you need to make sure you have the following things ready before you set up the pairing:
- An iPhone running the latest version of iOS
- A Mac running the latest version of macOS
- A working Apple ID account
- A wireless network that both the iPhone and Mac can connect to.
- A USB-A-to-Lightning cable or USB-C-to-Lightning cable that came with your iPhone
Setup: Ensure both iPhone and MacBook are using the same Apple ID
Before you can pair any Apple devices with one another, you need to be sure that they are using the same Apple account, i.e., logged in with the same @iCloud.com email address. This is important because no data will sync between the two devices if they’re using two separate iCloud accounts as iCloud is the platform that’s acting as the bridge between the two devices.
That is why you need to first log in to the same Apple ID on both devices to pair them together. Note the iCloud email and your Apple account password that you actively use before proceeding further down this guide.
On iPhone
If you haven’t signed in to any Apple ID on your iPhone yet, you can do so by opening the Settings app and tapping on the Sign in to your iPhone card at the top.

Now, enter your Apple ID and password on the next screen and if prompted, type the six-digit verification code that should be sent to your phone or any other Apple device.

In case you have already logged in to an Apple account but want to use another account to pair your iPhone with a Mac, then you’ll have to sign out of it. To sign out of an Apple account, open the Settings and tap on your name at the top.

Inside the Apple ID screen, scroll down to the bottom and tap on Sign Out.

On the next screen, enter your Apple ID password and tap on Turn Off at the top right corner.

You will now be logged out of the existing Apple account. You can now follow the initial steps in this section to sign in to the correct Apple account.
On Mac
If you haven’t signed in to any Apple ID on your Mac yet, you can do so by opening System Preferences on your Mac from the Launchpad, Dock, or Finder. When the System Preferences window appears, click on the Sign In option at the top right corner.
Next, enter your Apple ID and password as well as a six-digit verification code if prompted.
If you already have signed into an Apple account but want to change it to a different iCloud address, you can do so by opening System Preferences and clicking on Apple ID.

On the next window, select the Overview tab from the left sidebar and then click on Sign Out at the bottom.

You will now be logged out of the existing Apple account. You can now follow the initial steps in this section to sign in to the correct Apple account.
Related: 10 Ways to Easily Find Safari Tabs On Your iPhone and iPad
How to pair an iPhone with a Mac
Having been designed to work closely with other devices in the ecosystem, Apple’s iPhone and Mac can be paired in a lot of different ways, most of which work without even using a cable to connect the two devices.
Method #1: Pair with a wired connection
Before you can synchronize your iPhone with a Mac, you will need to first establish a wired connection between the two devices.
With both the iPhone and Mac powered ON, connect them using a USB-to-Lightning cable that comes with your iPhone.
Which cable should you use?
Some recent Macs come with a USB-C port while older models use a USB-A port to connect the devices. If you own an iPhone 12 or a newer model, you will have a USB-C-to-Lightning cable that should be compatible with modern MacBooks. If you owned an iPhone 11 or older device, you will have a USB-A-to-Lightning cable which would work well with older generation Macs. If you own a new Mac or an older iPhone or vice versa, you would need to find an adapter that connects the two devices.
Sync iPhone with Mac
Once you’ve connected the iPhone to the Mac, you can get things started on the Mac by opening the Finder app.

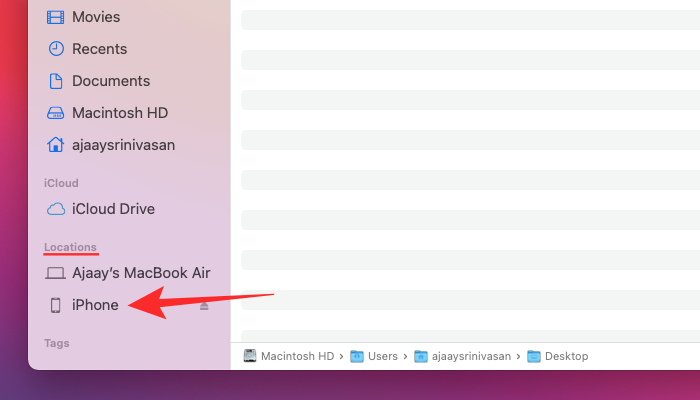
Inside the Finder app, your iPhone should appear in the left sidebar. If not, it will appear once you click on the Locations section. When your iPhone appears connected, click on it.
If this is the first time you’re connecting your iPhone to the Mac, click on Trust on your Mac in the “Trust iPhone” prompt that appears on the screen.

Similarly, you will get a “Trust This Computer” dialog on your iPhone to confirm your connection with the Mac. To proceed, tap on Trust.

Now, you’ll need to enter your device passcode to approve.

Once all that is done, you will be able to see your iPhone and all its details inside Finder.
To sync all the data from your iPhone to the Mac, click on Sync inside the General tab.

To sync selected files and data from your Mac to the iPhone, you can select the respective tabs at the top and once you’re inside of it, check the Sync <content> onto iPhone box at the top.

To save backups of your iPhone onto the Mac, select Back up all of the data on your iPhone to this Mac under “Backups” and click on Back Up Now.

Related: How To Inspect Element on iPhone
Method #2: Pair iPhone and Mac over Wi-Fi
If you’ve established a wired connection using method #1, then you’ll be able to pair your iPhone with a Mac wirelessly for all future uses. This works when your iPhone and Mac are connected to the same Wi-Fi network in which case your Mac will be able to sync data with the iPhone without a physical connection.
To set up wireless syncing using Wi-Fi, connect the iPhone with a Mac using the USB-to-Lightning cable like in Method #1. Now, open the Finder app as you did earlier and select your iPhone from the left sidebar.

When your iPhone shows up, scroll down the screen with the General tab and check the Show this iPhone when on Wi-Fi box. After turning on this option, click on Apply at the bottom right.

Once enabled, your iPhone will continue to show up inside the Finder app even if you disconnect its cable from the Mac.
If both your Mac and iPhone are connected to a Wi-Fi network, you can use backup or sync options on the screen to store your iPhone backups on the Mac or synchronize your Mac files and content with the paired iPhone.
Related: How to Access iCloud Keychain Passwords Instantly on Mac and iPhone
Method #3: Pair using iCloud
Perhaps the most simple and easy way to permanently pair an iPhone and a Mac is using iCloud. When both the devices are signed in to the same Apple account, you can share all your user data between the two devices wirelessly, even if they’re connected to different networks. When you enable iCloud and configure it to sync selected content over multiple devices, the data on all these devices stay the same, thus helping you continue where you left off from one device on another device.
On iPhone
To enable iCloud and set it up on an iPhone, open the Settings app and tap on your Apple ID card at the top.
Inside Apple ID, select iCloud.

On the next screen, you can turn on iCloud for all the apps and services listed on the screen by turning on the toggles adjacent to the apps/services.

If you only want to enable iCloud for certain apps, you can disable the toggle for apps and services you don’t need to be synced across other devices.
If you want your Mac and other Apple devices to remember the passwords and other sensitive information you save on your iPhone, you can tap on Keychain on this screen. On the next screen, turn on the iCloud Keychain toggle to pair your iPhone and Mac for password retention.

On Mac
To make sure all of your content gets synced between your iPhone and Mac, you will also have to enable iCloud on macOS and select which features you want to be synced up. To do that, go to Apple () menu > System Preferences.

Inside System Preferences, select Apple ID.
When your Apple account loads up, click on the iCloud tab from the left sidebar.

On the right-hand panel, you should see a list of services that you can sync via iCloud. To select which services or apps stay synced with your Mac, check the box next to them.

Some apps will also offer customization options to let you select what part of the app gets synced. To configure them in your preferred manner, click on Options on the right-hand side of the selected app and follow the on-screen instructions to customize further.

Method #4: Make and receive iPhone calls on Mac
Being a part of the Apple ecosystem, you can make and receive phone calls from your Mac directly if you pair it with your iPhone. This way, you can receive important phone calls on the Mac without having physical access to your iPhone. This feature requires that both the devices use the same Apple ID, are signed in to FaceTime using the same Apple ID, and are connected to the same Wi-Fi network.
On iPhone
To pair your iPhone with Mac to make phone calls, open the Settings app and select Phone.

Inside Phone, tap on Calls on Other Devices.

On the next screen, turn on the Allow Calls on Other Devices toggle at the top.

Once enabled, locate your MacBook or Mac from the list of devices that appear under “Allow Calls On” and turn on the toggle(s) adjacent to the macOS device you want to enable phone calls for.

You can now make calls directly on your Mac without using your iPhone. Apple also allows users to port ongoing calls from the iPhone to Mac or vice versa. If you wish to switch devices in the middle of a call, you can do so by tapping on the Audio tile inside the call screen and then selecting your MacBook from the list of available devices.

At any time, you can switch back to your iPhone again by tapping on the same Audio tile and selecting iPhone from the menu.

On Mac
While the above method should enable it on the Mac, you can choose this step to either ensure that phone calls feature has been turned on or to enable the feature directly on your Mac without consulting the iPhone guide above. To pair your Mac with an iPhone for phone calls, open the FaceTime app on the Mac. Once open, click on FaceTime from the menu bar and select Preferences.

When the Preferences window opens, select the Settings tab at the top and check the Calls From iPhone box.

This should route all your incoming calls from your iPhone to the Mac and you will also be able to initiate calls from the FaceTime app on this device.
To make a phone call on a Mac, open the FaceTime app, hover over the person you want to call inside your Recents list, and click on the Phone icon on the right side of the person’s name. You can also make calls by selecting a number from Contacts, Calendar, Safari, or any other app available on your Mac.

When you receive phone calls, you will see a banner appear at the top right corner of your Mac’s screen. You can click on Answer to let the call come through on your Mac.

Method #5: Turn on Text Message Forwarding to Mac
Macs have a Messages app similar to one on an iPhone but by default, you’ll be able to send and receive only iMessage texts. However, like with phone calls, you can also pair your iPhone with a Mac to receive all SMS messages that you get on your iPhone and also reply to them in text form. This is possible through a feature that Apple calls Text Message Forwarding which when enabled will let you send and receive SMS messages directly on a Mac.
On iPhone
To enable Test Message Forwarding, open the Settings app on your iPhone and select Messages.

Inside Messages, scroll down and tap on Text Message Forwarding.

On this screen, turn on the toggle adjacent to your Mac.

This should route all your SMS messages from your iPhone to the Mac.
On Mac
While the above guide is enough to turn on Text Message Forwarding, your Mac’s Messages app must be configured to receive messages from all your phone numbers. To do that, open the Messages app on your Mac and go to Messages > Preferences from the menu bar at the top.

To make sure you receive messages from the iPhone, click on the iMessage tab at the top and check the boxes adjacent to all the phone numbers under “You can be reached for messages at”.

In the same window, select your primary phone number from the list of options under “Start new conversations from”.

This will make sure any reply you send from your Mac is sent via your phone number and not your iCloud email address.
Method #6: Enable Handoff on iPhone and Mac
Apple offers a Handoff feature to let you start someone on one Apple device and resume it on another device seamlessly. The feature can be used for a multitude of purposes like drafting an email on an iPhone and continuing where you left off on a Mac. The Handoff feature ties together most Apple devices like an iPhone, Mac, iPad, or Apple Watch and works on Mail, Maps, Safari, Reminders, Calendar, Contacts, Pages, Numbers, Keynote, and even some third-party apps.
Before you enable Handoff on the iPhone and Mac, you need to sort these things:
- Both iPhone and Mac are signed in to the same Apple ID.
- Wi-Fi and Bluetooth are enabled on both devices.
On iPhone
To pair your iPhone with a Mac using Handoff, open the Settings app on iOS and select General.

Inside General, tap on AirPlay & Handoff.

On the next screen, turn on the Handoff toggle.

When switching from a Mac to an iPhone, you will see Handoff options as a banner at the bottom of your iPhone’s screen when you access the App Switcher.

On Mac
To pair your Mac with an iPhone using Handoff, go to Apple () icon > System Preferences. You can also open System Preferences from the Dock, Launchpad, or Finder.

Inside System Preferences, select General.

At the bottom of the window, check the Allow Handoff between this Mac and your iCloud devices box.

This should enable Handoff on both your iPhone and Mac. Once enabled on both devices, you can use Handoff to switch from iPhone to Mac by clicking the app’s Handoff icon from the Dock.

Method #7: Connect iPhone and Mac via Bluetooth
You can pair your iPhone with a Mac using a Bluetooth connection to share files, share cellular data, use AirDrop, Handoff, and other continuity features. For this to work, you need to enable Bluetooth on both iPhone and Mac.
On iPhone
To pair your iPhone with a Mac, open the Settings app on iOS and select Bluetooth.

On the next screen, turn on the Bluetooth toggle at the top.

You will now see a list of devices you connected to via Bluetooth recently. If you haven’t connected your Mac to the iPhone, you will have to pair it manually by selecting your Mac from under “Other Devices”.

On Mac
To pair your Mac with an iPhone, go to Apple () icon > System Preferences. You can also open System Preferences from the Dock, Launchpad, or Finder.
Inside System Preferences, select Bluetooth.

On the window that opens, click on Turn Bluetooth On.

Your Mac’s Bluetooth will now turn on and it will connect to all the available devices in the vicinity automatically provided they’re on as well. If you want to connect the Mac to your iPhone, wait for the screen to show your iPhone and when it appears, click on Connect.

You will now see an authentication code on the Mac which you need to verify with the one that shows up on your iPhone. You may also have to approve the connection on the iPhone to proceed. When the connection is successful, your iPhone will appear inside the Devices box and will be labeled as “Connected”.
Method #8: Connect Mac to iPhone’s mobile hotspot
Apple offers an Instant Hotspot feature that lets you connect a Mac to an iPhone’s cellular data through a personal hotspot. When paired successfully, the Mac will be able to connect and browse the internet using your iPhone mobile data without requiring a cable to connect to either device. For this feature to work, both your iPhone and Mac should be signed in to the same Apple ID.
Start a Personal Hotspot on iPhone
Before you pair your Mac to an iPhone’s hotspot, you need to first turn on mobile data on the latter and then enable its hotspot. For that, open the Settings app and select Mobile Data.

On the next screen turn on the Mobile Data toggle at the top.

Once enabled, go back to the previous screen, i.e., the Settings screen, and tap on Personal Hotspot.

Inside Personal Hotspot, turn on the Allow Others to Join toggle at the top.

In the prompt that appears, select Turn on Wi-Fi and Bluetooth to enable the mobile hotspot wirelessly.

You have successfully enabled Personal Hotspot on the iPhone. Now it’s time to connect the Mac to this hotspot.
Connect your Mac to the hotspot
After a personal hotspot has been established, you can connect your Mac to it. To do that, click on the Wi-Fi icon from the Menu bar, and in the menu that appears, turn on the Wi-Fi toggle.

Your iPhone should now appear under “Personal Hotspot” among other networks. To connect to its hotspot, click on it.
When your Mac is connected to the iPhone’s hotspot, you should see the hotspot icon next to your iPhone turn blue.

The Wi-Fi icon in the Menu bar will also switch to the Personal Hotspot icon.
If you wanted to pair your iPhone with a Mac for the sole purpose of file transfer, then AirDrop should be the perfect answer. With AirDrop, you can share anything that’s shareable between your Apple devices and even with others’ iPhones, iPads, and Macs. You can use the feature to share pictures, videos, documents, links, notes, voice memos, locations, contacts, and other items that can be shared from apps.
To use Airdrop, you need to make sure that:
- Wi-Fi and Bluetooth on the iPhone and Mac are enabled.
- iPhone’s Personal Hotspot feature is disabled.
- iPhone and Mac are kept within 30 feet of each other to allow the successful transfer of files.
On iPhone
Enable AirDrop to receive files
To enable AirDrop on your iPhone, launch the Control Center and tap and hold on the Wi-Fi icon or Bluetooth icon.

When you do that, the network menu in the Control Center expands to show more options. To enable AirDrop, tap on the Airdrop icon inside the overflow menu.

Choose either Contacts Only or Everyone to make sure your iPhone is discoverable by people whose contact details you have saved or by everyone around you.

You have successfully enabled Airdrop on your iPhone. The instructions above are for when you want to receive files from a Mac or another Apple device.
Use AirDrop to send files
To send files from an iPhone to a Mac via Airdrop, locate the file or app item on your iPhone and open it. Once opened on full screen, tap on the Share icon (generally present at the bottom of the screen).

In the Share menu, select AirDrop.

On the next screen, you should see all the Apple devices that are enabled with AirDrop. Here, tap on your Mac.

The transfer will commence once the Mac approves this file and when it starts you’ll hear a chime. Once complete, you will hear another chime.
On Mac
Enable AirDrop to receive files
To enable AirDrop on your Mac, click on the Control Center icon from the Menu bar at the top. In the overflow menu that appears, click on the Airdrop icon to turn it on.

When enabled, your Mac’s Bluetooth will also be turned on and their icons will now turn blue. After Airdrop has been enabled, click on the arrow icon on its right-hand side.

Select either Contacts Only or Everyone to make sure your iPhone is discoverable by people whose contact details you have saved or by everyone around you.

You have successfully enabled Airdrop on your Mac. The instructions above are for when you want to receive files from an iPhone or another Apple device.
Use AirDrop to send files
To send files from a Mac to an iPhone via Airdrop, locate the file or item you want to share and right-click on it. To share items from an app, you can access this menu by clicking on File from the Menu bar at the top. In the menu that appears, go to Share > AirDrop.

If the iPhone’s AirDrop has been enabled, you should see it inside the AirDrop window that appears next. Here, click on your iPhone to send the file from your Mac.

You will hear two different tones – one when AirDrop starts sending the file and another when the file transfer is complete.
▶ How to Airdrop Between Mac and iPhone
Method #10: Enable Apple Music Sync Library on iPhone and Mac
If you’re someone who uses Apple Music for streaming songs and podcasts, you can access your entire music library as well as the songs you’ve downloaded using the Sync Library feature. This will make sure that whatever songs or playlists you listen to on your iPhone remain synced with the Apple Music app on the Mac and vice versa.
The feature requires that you’re subscribed to Apple Music and its apps on the iPhone and Mac are all signed in to the same Apple ID.
On iPhone
To enable Sync Library on your iPhone, open the Settings app and select Music.

Inside Music, turn on the Sync Library toggle under “Library”.

This should take a while for your iPhone to upload your library to iCloud, especially if your library is vast. Once uploaded, you’ll be able to access your song tracks (up to 100,000 songs) from any Apple device including your Mac.
On Mac
You can enable Sync Library on your Mac by opening the Apple Music app. Once the app is open, go to Music > Preferences from the Menu bar at the top.

When the Preferences windows open, click on the General tab at the top and check the Sync Library box to enable it. If you wish for your Mac to download the songs in your library as soon as they’re added, check the Automatic Downloads box on the same screen.

To confirm your decision, click on OK at the bottom right corner of the Preferences window.

You will have to wait a while for your library to get uploaded and synced. Once done, it will be accessible from all your Apple devices including your iPhone.
Why should you pair your iPhone with a Mac?
If you’re wondering what you can gain from pairing your iPhone with a Mac, then the following reasons should help you make up your mind:
- Transfer data between your iPhone and Mac swiftly and effortlessly
- Sync all or selected content from Mac to iPhone both wired and wirelessly
- Sync an ongoing task or work between the two devices in such a way that you start working on one device and continue on the other.
- Make and receive iPhone calls directly on your Mac
- Get SMS from your iPhone forward to the Mac and also send replies from it using the same phone number.
- AirDrop files and app items instantly and wirelessly without hassles.
- Back up photos from your iPhone and access them on your Mac using iCloud.
- Use Handoff to copy and paste content from iPhone to Mac or vice versa.
- With Continuity Camera, you can scan documents from your iPhone and move them directly to an email, webpage page, or an app on a Mac.
- Track your iPhone on the Mac or vice versa using Find My.
- Connect your Mac to your iPhone’s cellular network using Personal Hotspot.
- Sync your music library between Mac and iPhone.
FAQs
- Will you lose your data if you pair iPhone with the Mac?
No. The whole idea behind pairing the two devices is to let you access all the files and content from both of your devices. If you unpair the two devices, your data may get deleted from any one of your devices but should stay intact on the device where you originally saved them.
- Can files be sent via Bluetooth to Mac?
Since the 2000s, we were familiar with sending music and photos via Bluetooth. But when using Apple devices you can use AirDrop to share files and the transfer happens instantly without taking much time. AirDrop uses both WiFi and BlueTooth technologies to send items to any Apple devices in your vicinity.
- Can your music sync through iTunes?
If you listen to songs with Apple Music, all content will be synced between devices as long as the Sync Library feature is enabled on both your iPhone and Mac. Check method #10 in the guide above to learn how to enable the feature. If you have a lot of local audio content and you don’t subscribe to Apple Music, you can sync your music using methods #1 and #2.
- How do you transfer iPhone text messages to a Mac computer?
By default, Apple shows all your iMessage texts from your iPhone to the Mac. To see your regular SMS messages from the iPhone, you need to enable the Text Forwarding feature using method #5.
That’s all you need to know about pairing your iPhone with a Mac.
RELATED